Google Pay is the simplest way to send money home to your family, recharge your mobile, or pay the neighbourhood store. Send or receive money straight from your bank account with zero fees, to almost anyone. You can use it wherever you see UPI or Google Pay. You can send or receive money even if your contact is not on Google Pay. How to use Google Pay? How to set Google Pay account?
To use Google Pay: You’ll need an Internet connection, an Indian bank account with an ATM card and an Indian phone number.
Google Pay was earlier call Tez!
The United Payments Interface (UPI) saw a total of about 822 million transactions in July 2019. Google Pay and PhonePe, clocked 300 million transactions each. They hold over 35 per cent market share each.
Table of Contents
How to Send money through Google Pay?
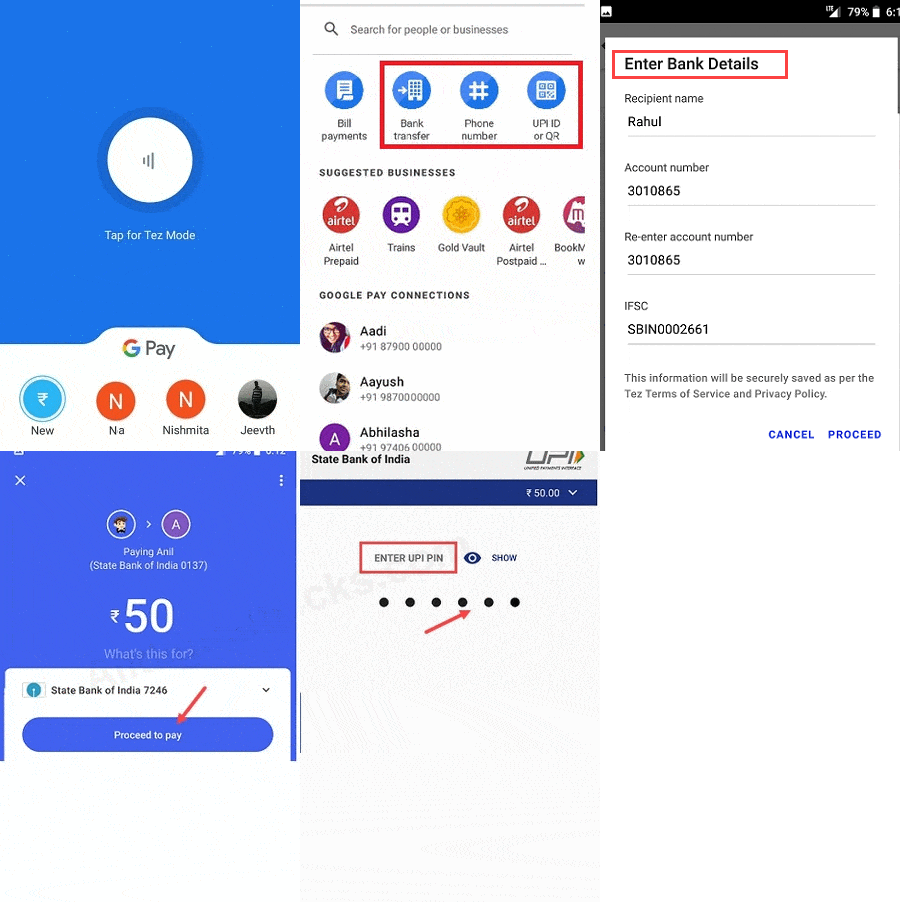
Starting a payment is as simple as starting a new conversation with someone in your Google Pay contacts or by entering anyone’s UPI ID or bank details.
- Open Google Pay (after you have set up)
- From the bottom of the screen, swipe up.
- Under ‘Payments’, tap a contact. If you don’t see the person that you want to send money to, tap New and search for them by name, phone number, account number or UPI ID. Make sure that you enter the correct details. Once you send the money, the transaction can’t be cancelled.
- To Send Money using Bank Transfer, you need not add a beneficiary.
- Sending money to Person who is on Google Pay is like Sending a WhatsApp message.
- Sending money to a phone number requires the person to be on Google Pay.
- Tap Pay.
- Enter the amount, description and select the form of payment.
- Tap Proceed to pay.
- Enter your UPI PIN.
- When the money has been sent, you’ll get a notification. You’ll also receive an SMS from your bank with the debited amount.

Google Pay Send Money using Bank Transfer
Google Pay makes it easy to send receive money instantly using your existing bank accounts. No more reloading mobile wallet balances or withdrawal fees.
Note: If your transaction to your contact’s bank account fails, the bank might debit the money from your bank account and then refund it. In this case, you will receive two SMS messages, one for the debit and the second for the refund.
Advantages of Google Pay Account
UPI payment is a revolutionary payment platform, a truly Made in India technology. We should see many people adopting it as time progresses. It has made payment few clicks a
Pay anyone. Even those without Google Pay
Starting a payment is as simple as starting a new conversation with someone in your Google Pay contacts or by entering anyone’s UPI ID or bank details.
Conveniently pay bills
Pay for electricity, gas, water, DTH, mobile, and more. You only need to link your biller accounts once to pay your bill with just a few taps. Google Pay works with billers across the country.
Pay online with Google Pay
Google Pay – anywhere BHIM UPI is accepted. When you checkout, look for the Google Pay logo or use your Google Pay UPI ID.
Multiple layers of security from your bank, UPI, and Google
Google Pay protects your money with a world-class security system that helps detect fraud and prevent hacking. Each transaction is secured with your UPI PIN, and you can safeguard your account with a device lock method such as your fingerprint.
Get rewarded
Get Google Pay Scratch Cards (TM) in the app and be eligible to win up to ₹1,000 with each eligible transaction. If you win, your rewards go straight into your bank account.
Transfer money to anyone nearby
Use Tez Mode to send money securely to people nearby without sharing private details like your phone number.
Limit on Google Pay Transactions
The limit is set by the UPI Platform. This limit is applicable across the UPI apps.
- The Google pay has a daily limit of Rs 1 lakh on fund transfer.
- You can’t make more than 10 transactions in a day through the app.
So are you convinced that you need Google Pay? Let’s get started on how to set up Google Pay Account!
How to set up Google Pay Account?
What you need if you want to have a Google Pay account
1. You must have a bank account.
2. Your mobile number must be linked with your account number.
3. You must have an ATM or Debit card.
Get the Google Pay app
- Download Google Pay on phones running Android 5.0 (Lollipop) or higher.
- Enter your phone number.
- Sign in with your Google account.
- Follow the instructions to secure your Google Pay app and add a bank account.
- To make Google Pay more secure, you can require a Google PIN to use the app. You can also use your existing screen lock to secure Google Pay. Note: Your Google PIN is different from your UPI PIN or the PIN that you use to unlock your phone.
How to add a bank account to Google Pay
When you first set up Google Pay, you’ll be asked to add an Indian bank account so that you can send and receive money. You must use that mobile number which is registered with your Bank account. Google Pay will automatically detect your bank account which linked with your account.
Important: To prevent errors, do not leave the Google Pay app during bank registration.
How to register with Google Pay
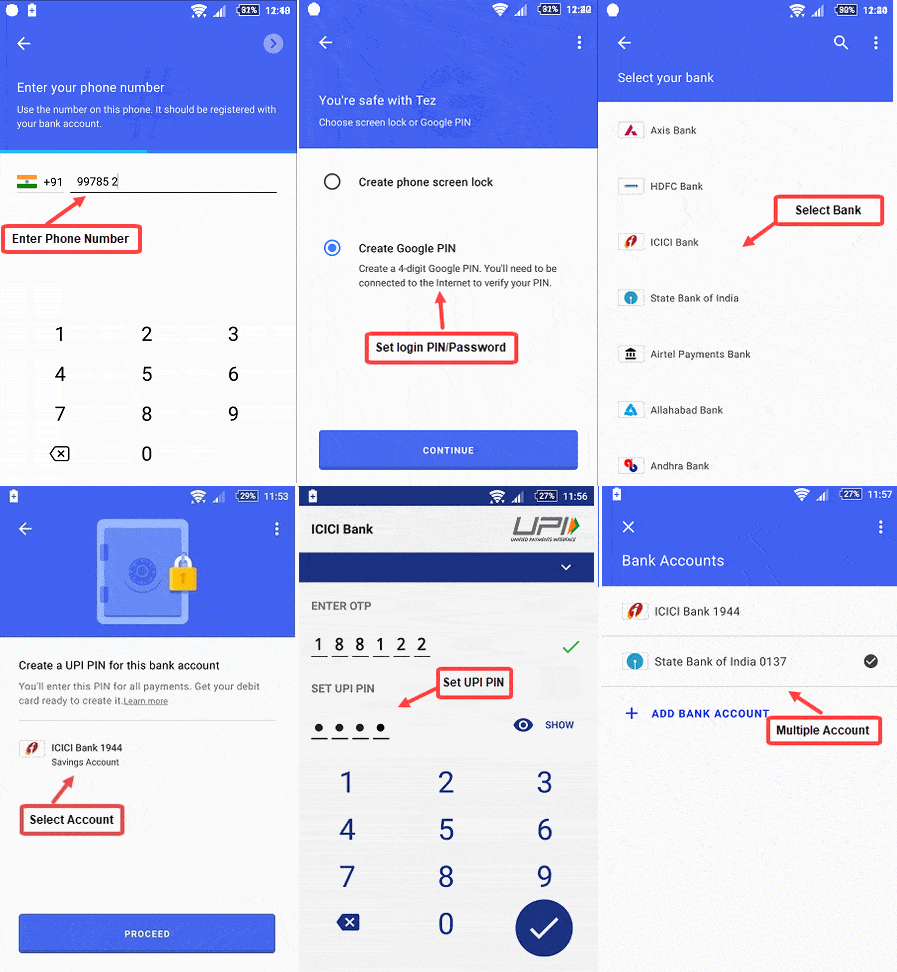
- Type your mobile number. Here you have to type your registered mobile number with your bank account.
- Your mobile number will be verified, enter the OTP on the next screen which will be sent to your mobile number via SMS, OTP will be automatically detected so you don’t need to type.
- You will be given 2 options to set up the Google Pin, this is the login password to open your Google Pay App. You can also set your Phone Screen Lock Password, PIN, Pattern Lock.
- After setup a login PIN/password, you are now registered with Google Pay
- Next step is to add bank account.
How to add Bank Account to Google Pay
- Tap Add bank account.
- Choose your bank from the list. If you don’t see your bank, it doesn’t work with Google Pay yet.
Note: You might need to give Google Pay permission to send a verification SMS to your bank. - You need to create the UPI PIN which is used for authentication i.e for you to transfer money/pay bill. You can not do any transaction without it. This is a setting up a double-check. You need Google PIN to open Google App and UPI Pin to send/receive money
- Create a UPI Pin.
- If you have an existing UPI PIN, you’ll be asked to enter it. If you don’t remember your PIN, tap Forgot PIN and follow the instructions.
- If you don’t have a UPI PIN, enter your debit card information.
Note: Maestro debit cards do not have expiry dates. To add a Maestro debit card, use 01/49 as the expiry date.

How to Link Your Bank account with Google Pay
How to request money using Google Pay
- Open Google Pay
- From the bottom of the screen, swipe up.
- Tap the photo of the contact for which you require payment.
- You can also search for their name, phone number, account number or UPI ID.
- At the bottom of the screen, tap Request.
- Enter the amount and description.
- Tap Request.
When the other person pays or declines your request, you’ll get a notification from Google Pay.
Use Google PIN to secure your account
Note: If Google PIN is active, you’ll need to be connected to the Internet to open the app.
- Open Google Pay.
- In the top left, tap your photo > Security.
- Select Use screen lock to use your existing pattern, PIN or password that you use to lock your phone
- Select Use Google PIN to use Google PIN
Change your Google PIN
- Open Google Pay.
- In the top left, tap your photo > Security.
- Select Use Google PIN.
- Tap Forgot PIN.
- Follow the instructions.
Find your UPI ID on Google Pay
UPI is used for money transfers on payment apps. Your UPI ID is an address that identifies you on UPI (typically yourname@bankname). To add a bank account to Google Pay, your bank must work with UPI. To find your UPI ID:
- Open Google Pay
- In the top left, tap your photo.
- Tap Bank account.
- Tap the bank account whose UPI ID you want to view.
- You will find the associated UPI ID under “UPI IDs”.
Related Articles:
- How India pays: Cash, Cheque,NEFT,Cards etc
- How to use IMPS to send money instantly
- IFSC, MICR, SWIFT Code, Difference between IFSC and MICR, IFSC and SWIFT
- Difference between NEFT, RTGS, IMPS, UPI
- WhatsApp Payment: How to use Whats App to Send Money


